Apache Click in a Click - Part 4 [A Simple Example]
The following are the pre-requisites for this demo -
The first step is to create a new dynamic web project. See below screenshot for details.
The next step is to provide a name for the project. For our example, I am giving the name as ApacheClickv2.2.0.
Click on New Runtime and add the 'Apache Tomcat v7.0' runtime and click 'Next'.
Browse to the Tomcat's installation directory and also select the JDK as shown below and Click 'Finish'.
Click 'Next' and set the 'Default output folder' as the 'WebContent/WEB-INF/classes' and click 'Next'.
Select the 'Generate the web.xml deployment descriptor' option and click 'Finish'. In the below screenshot, we can see the project is created with its required artifacts.
Here I will be explaining how to implement a simple application. The application will have the following features [The application is simplified for the sake of the demo and we can extend on top of it at any level you desire].
- Update User Profile
- Display User Profile
- click-2.2.0.jar
- click-extras-2.2.0.jar
For this first we need to add the ClickServlet configuration and also add a page in the welcome file list [web.xml] as shown below:
<?xml version="1.0" encoding="UTF-8"?>
<web-app>
<display-name>ApacheClickv2.2.0</display-name>
  <servlet>
    <servlet-name>ClickServlet</servlet-name>
    <servlet-class>org.apache.click.ClickServlet</servlet-class>
    <load-on-startup>0</load-on-startup>
  </servlet>
  <servlet-mapping>
    <servlet-name>ClickServlet</servlet-name>
    <url-pattern>*.htm</url-pattern>
  </servlet-mapping>
  <welcome-file-list>
    <welcome-file>index.html</welcome-file>
  </welcome-file-list>
</web-app>
Next we need to create a file - index.html under the ApacheClickv2.2.0/WebContent directory as shown below.
<html>
   <head><meta http-equiv="Refresh" content="0;URL=userProfileLogin.htm"></head>
</html>
As explained in my previous posts, pages are the heart of the click framework. In our case, we need to create a Page class [UserProfilePage.java] that extends the org.apache.click.Page. The contents of the page should be as given below.
package com.blogspot.javaclickonline.app.pages;import org.apache.click.Page;
import org.apache.click.control.FieldSet;
import org.apache.click.control.Form;
import org.apache.click.control.Submit;
import org.apache.click.control.TextField;
import org.apache.click.extras.control.DateField;
import org.apache.click.extras.control.EmailField;
import org.apache.click.util.Bindable;import com.blogspot.javaclickonline.app.dto.UserDTO;public class UserProfilePage extends Page { /**
*
*/
private static final long serialVersionUID = -7563023865079430085L; private UserDTO userDTO = new UserDTO();
@Bindable protected Form userProfileForm = new Form("userProfileForm");
public UserProfilePage() {
FieldSet fieldSet = new FieldSet("User");
userProfileForm.add(fieldSet);
TextField firstNameField = new TextField("firstName", "First Name", 20, true);
firstNameField.setMaxLength(20);
firstNameField.setFocus(true);
fieldSet.add(firstNameField);
TextField lastNameField = new TextField("lastName", "Last Name", 20, true);
lastNameField.setMaxLength(20);
fieldSet.add(lastNameField);
DateField dateOfBirthField = new DateField("dateOfBirth", "Date of Birth", 10, true);
dateOfBirthField.setFormatPattern("MM/dd/yyyy");
fieldSet.add(dateOfBirthField);
EmailField emailField = new EmailField("email", "Email", 40, true);
emailField.setMaxLength(40);
fieldSet.add(emailField);
userProfileForm.add(new Submit("Submit", this, "doSubmit"));
userProfileForm.add(new Submit("Clear", this, "reset"));
}
public boolean doSubmit() { if(userProfileForm.isValid()) {
userProfileForm.copyTo(userDTO);
getContext().setRequestAttribute("userDTO", userDTO);
setForward("displayUserProfile.htm");
return true;
}
return false;
}
public boolean reset() {
userProfileForm.clearValues();
return true;
}
}In the above mentioned Page class, I have created a FieldSet. A field set is like a container which contains one or more controls. In this field set, I have added 2 Text fields, a Date field and an Email field. Once this is created, the field set is then added to the form. Also to the form, there are 2 submit buttons added - one is for validating and posting the result to the display page and the other button is for clearing the entered values.
The next step is to create a new page userProfile.htm under the ApacheClickv2.2.0/WebContent directory as shown below.
<html>
 <head>
  <title>Apache Click v2.2.0 Demo</title>
  $headElements
  $jsElements
 </head>
 <body>
  $userProfileForm
 </body>
</html>
The next step is to create a new Page class [DisplayUserProfilePage.java] which again extends org.apache.click.page.Page class.
package com.blogspot.javaclickonline.app.pages;import org.apache.click.Page;
import org.apache.click.control.ActionLink;
import org.apache.click.util.Bindable;import com.blogspot.javaclickonline.app.dto.UserDTO;public class DisplayUserProfilePage extends Page { /**
*
*/
private static final long serialVersionUID = 7097251195783330196L;
@Bindable protected ActionLink back = new ActionLink("back", this, "backToUserProfilePage");
private UserDTO userDTO = null;
public void setUserDTO(UserDTO userDTO) {
this.userDTO = userDTO;
}
public UserDTO getUserDTO() {
return userDTO;
}
public boolean backToUserProfilePage() { setForward("userProfile.htm");
return false;
}
@Override
public void onRender() { super.onRender();
userDTO = (UserDTO) getContext().getRequestAttribute("userDTO");
addModel("userDTO", userDTO);
}
}The next step is to create a new page displayUserProfile.htm under the ApacheClickv2.2.0/WebContent directory as shown below.
<html>
 <head>
  <title>Apache Click v2.2.0 Demo</title>
 </head>
 <body>
  <table width="50%" cellpadding="0" border="1" cellspacing="0">
   <tr>
    <td>First Name</td>
    <td>:</td>
    <td>$userDTO.firstName</td>
   </tr>
   <tr>
    <td>Last Name</td>
    <td>:</td>
    <td>$userDTO.lastName</td>
   </tr>
   <tr>
    <td>Date of Birth</td>
    <td>:</td>
    <td>$userDTO.dateOfBirth</td>
   </tr>
   <tr>
    <td>Email</td>
    <td>:</td>
    <td>$userDTO.email</td>
   </tr>
  </table>
  <br/>
  $back
 </body>
</html>
Finally we need to modify the click.xml as given below.
<?xml version="1.0" encoding="UTF-8"?>
<click-app>
  <pages package="com.blogspot.javaclickonline.app.pages"/>
  <mode value="trace"/>
  <headers>
    <header name="Pragma" value="no-cache"/>
    <header name="Cache-Control"
       value="no-store, no-cache, must-revalidate, post-check=0, pre-check=0"/>
    <header name="Expires" value="1" type="Date"/>
  </headers>
</click-app>
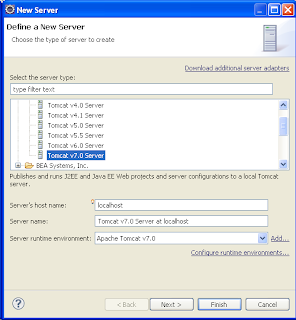
Create a new Server configuration for deploying the application. Right click in the server view and select New --> Server. The New Server dialog opens as shown below.
Select Tomcat v7.0 Server configuration and click Next.
Select the project - ApacheClickv2.2.0 and click Add and click Finish. Launch the server. If the application is deployed correctly, you can access it using the following url -
http://localhost:8080/ApacheClickv2.2.0
Enter the fields and click on Submit. The user will be diverted to the display user profile page.
With this we have completed all the 4 part - Apache Click v2.2.0 Tutorial.
In the next blog/post, we will dig deep into a different Java framework/feature.


No comments:
Post a Comment