| Spring-WS: Implementing Contract First Web services |
Spring Web Services (Spring-WS) is a product of the Spring community focused on creating document driven web services. There are 2 common development styles of creating web services -
- Contract First - This means we will define the contract first (WSDL - Web services definition language) and use this WSDL to generate the java code to implement the web services.
- Contract Last - This means we will define the java code first and use the java code to generate the WSDL. For example, web services stacks like AXIS, CXF support this style of web service implementation.
- This is based on the WS-I (Web services interoperability) specification. WS-I provides the interoperability guidance for core web services specifications such as SOAP, WSDL and UDDI. Since Spring web services are created following this specification, it allows other technologies [Java, .NET, Python] to easily integrate with each other.
- Fragility - Contract First web services is based on having the contract (WSDL) written up first and then generate the java classes. If there are a large number of clients using this web service, it is better to go in this approach because this will avoid the different clients to change their client implementations. This is one of the major advantages of implementing Contract First web services.
- Re-usability - For contract first web services, we need to write up the WSDL first and also define the different elements in the WSDL (which becomes the part of the WSDL message). In such cases, if we define the schema in a separate schema definition file (XSD), we can re-use this in different schemas and WSDLs using an import statement.
- Contract First web services provides loose coupling between the contract and implementation.
The following are the pre-requisites for this demo -
- SpringSource Tool Suite [STS - 32bit/64bit].
- Spring Framework [v3.1.0.M1]
- Spring-WS [v2.0.2]
- Apache Tomcat [v7.0]
- JDK 6 [32bit/64bit]One thing to note here is that if you are running the application on a 64 bit machine, make sure you install the 64 bit STS and 64 bit JDK 6. Otherwise you will end up in getting issues while launching the STS.
- Soap-UI Tool [v4.0.0]
The first step is to create a new dynamic web project as shown below.
The next step is to provide a name for the project. For our example, I am giving the name as SpringWS. Click on New Runtime and add the 'Apache Tomcat v7.0' runtime and click 'Next'.
Browse to the Tomcat's installation directory and also select the JDK as shown below and Click 'Finish'
Click 'Next' and set the 'Default output folder' as the 'WebContent/WEB-INF/classes' and click 'Next'.
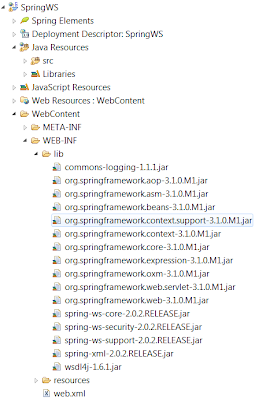
Select the 'Generate the web.xml deployment descriptor' option and click 'Finish'. Once the project is created, copy the following jars in the WebContent/WEB-INF/lib folder.
- commons-logging-1.1.1.jar
- org.springframework.aop-3.1.0.M1.jar
- org.springframework.asm-3.1.0.M1.jar
- org.springframework.beans-3.1.0.M1.jar
- org.springframework.context.support-3.1.0.M1.jar
- org.springframework.context-3.1.0.M1.jar
- org.springframework.core-3.1.0.M1.jar
- org.springframework.expression-3.1.0.M1.jar
- org.springframework.oxm-3.1.0.M1.jar
- org.springframework.web.servlet-3.1.0.M1.jar
- org.springframework.web-3.1.0.M1.jar
- spring-ws-core-2.0.2.RELEASE.jar
- spring-ws-security-2.0.2.RELEASE.jar
- spring-ws-support-2.0.2.RELEASE.jar
- spring-xml-2.0.2.RELEASE.jar
- wsdl4j-1.6.1.jar
We will now focus on implementing a MoviesBrowser service. This would be a simple service which would list all movies based on the genre of the movie.
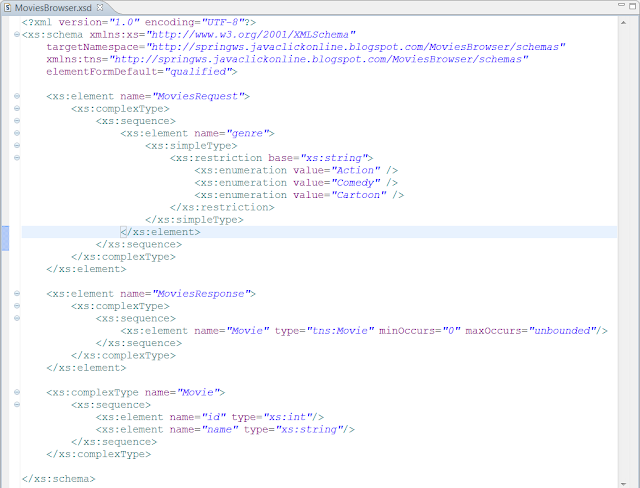
Since we are implementing a contract first web service, we should first define the contract - which in our case would be the WSDL. First we will define the request and response elements for the Movies browser service by writing a schema definition file (XSD). For this, we will create a new MoviesBrowser.xsd under WEB-INF/resources. This is a very simple schema definition which defines an request element MoviesRequest which has a child element - genre. I have added a restriction for genre element by accepting only the following enumerated values - Action, Comedy and Cartoon. Also there is a response element MoviesResponse which has child elements - id and name. The contents of the schema is as shown below.
Next we will define the contract which is the WSDL as shown below. There are different tools which we can use to generate this WSDL. Now again there are ways to create and publish the WSDL dynamically using Spring-WS. I will show that later in this tutorial, but for now, we will concentrate on creating the WSDL and publishing it.
Now lets understand the WSDL. There are 5 main elements in a WSDL:
- types - This defines the data types that will be used by the web service. Here in our case, I have defined the types in a schema definition file (XSD) and then imported it in here.
- message - This defines the data elements of an operation. Each message can have one or more parts. The parts can be considered as parameters in a method call. In our case, the request is MoviesRequest and response is MoviesResponse.
- portType - This describes the web service, operations that can be performed and also the messages that are involved in an operation. In our case, the portType MoviesBrowser defines an operation 'DisplayMovies' which takes in MoviesRequest as input parameter and returns a MoviesResponse.
- binding - This defines the message format and the protocol details for each port.
- A binding element has 2 attributes - name and type. Name can be any name that defines the name of the binding. The type attribute refers to the port for the binding. In our case, it is mapped to MoviesBrowser portType.
- soap:binding element - It has 2 attributes - style and transport. The style attribute can have values 'document' or 'rpc'. In our case, it is document. The transport attribute defines the SOAP protocol to use. In this case, it is HTTP.
- operation element - It defines each operation that the port exposes. For each operation, we have to define the SOAP action. We must also specify the encoding for the input and output. In our case, it is 'literal'.
- service - This defines the different services enclosed within the WSDL document.
- The name attribute just needs to be a unique name for the service.
- port - used to specify the location of the service. It has 2 attributes: name and binding. Name can be any name but binding should refer to an already defined binding in the WSDL. In our case, it refers to the MoviesBrowserBinding.
- soap:address - Since this is a soap service, we use the soap:address to specify the location of the service. In our case, I will give it as http://localhost:8080/SpringWS/
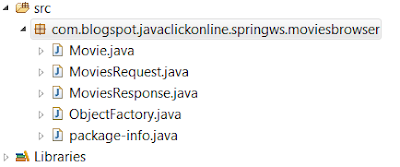
In our example, I will be using JAXB as this is the easiest one which we can use. Also the JAXB distribution is now part of the JDK and also the compiler XJC (which is used for compiling the schema to generate java classes) is available with JDK. To generate the classes, type the following command in the command prompt -
C:\>xjc WebContent/WEB-INF/resources/MoviesBrowser.xsd -d src -p com.blogspot.javaclickonline.springws.moviesbrowser
Note: The pre-requisites for running this command are the following -
- Set the JAVA_HOME property to the JDK directory. It can be done as shown below -
- C:\>set JAVA_HOME=<JDK Home Directory>;
- Set the path to the Java's bin directory be added to the system path. It can be done as shown below -
- C:\>set path=%path%;<JDK Home Directory>\bin;
Next we will need to implement the Endpoint that is used to handle incoming messages. A endpoint is created by annotating a class with @Endpoint annotation. In our case, the MoviesBrowserEndPoint is annotated with @Endpoint annotation. Also we will implement a method -
public MoviesResponse getMovies(@RequestPayload MoviesRequest request) {... }
A complete example is as shown below.
There are several annotations on this method -
- @PayloadRoot - This annotation is used to indicate which sort of messages can be handled by the getMovies(...) method. There are 2 properties to this annotation -
- namespace - This should map to the namespace of the MoviesBrowser definition
- localPart - This should map to the MoviesRequest local part.
- @ResponsePayload - If this method returns a response, we need to have this annotation. In our case, this will map to the MoviesResponse object.
- @RequestPayload - This will map to the request payload. In this case, it will map to the MoviesRequest object.
The class below provides a simple implementation of the MoviesBrowserService as shown below.
Next step is to define the MessageDispatcherServlet in the WEB-INF/web.xml. The servlet is mapped to the URL pattern '/*'.
In addition to the web.xml, we will need a Spring-WS specific configuration file (WEB-INF/spring-ws-servlet.xml). The name of the file is derived from the servlet-name 'spring-ws' appended with '-servlet.xml'. This file will contain the definition of endpoints, interceptors, etc. The spring-ws-servlet.xml is as shown below.
Let's understand the mappings in the above spring configuration file.
- context:component-scan - This is used to detect all the classes with @Endpoint annotation.
- sws:annotation-driven - We are instructing Spring-WS to use annotation driven end points. This will enable the detection of @PayloadRoot, @RequestPayload and @ResponsePayload annotations.
- sws:interceptors - Here I am adding one validating interceptor to validate the request and response pay load. This will help in validating the request or response payload and providing with user friendly error messages for the consumer of the web service.
- schema - This tells the interceptor that request/response pay load has to be validated against the schema definition file (XSD)
- validateRequest - This can be true/false. If true, the interceptor intercepts the request and validates it, otherwise, it will not validate it.
- validateResponse - This can be true/false. If true, the interceptor intercepts the response and validates it, otherwise, it will not validate it.
- moviesRequest bean definition - This is used to publish the MoviesBrowser.wsdl so that we can access the WSDL using the URL in our case - http://localhost:8080/SpringWS/moviesRequest.wsdl
- Apart from all this, I have also wired up the moviesBrowserService which is being used in the MoviesBrowserEndpoint. This currently provides the implementation of the getMoviesByGenre(...) method.
For deploying the application, right click on the 'Tomcat v7.0 Server' in the Servers view and select 'Add and Remove...' option. Next add the project SpringWS on the server. Start the server and this will deploy the application on the server. Once deployed, we can check if the web service is deployed correctly by accessing the following URL.
http://localhost:8080/SpringWS/moviesRequest.wsdl
To test the web service, we can use the soap-ui tool. For this we need to first create a new soapUI project. Provide a project name and browse to the path of the WSDL file and click OK. Expand the project -> MoviesBrowserBinding -> DisplayMovies -> Request 1. See below for the testing done by the soapUI tool.
Now some of the extra things we can configure in the application are the following -
- transformWsdlLocations - We can add an init-param for the servlet which says transformWsdlLocations as true. This will take care of changing the location of the web service to change relative to the application URL.
- Dynamically create and publish the WSDL. For this, we can add the following configuration in the spring configuration file.
To summarize, we learned how to write a contract first web service, deploy it and test it. In case you want to read more on this topic, please go to the Spring's documentation


