JEE Custom Search Portals

Sunday, January 30, 2011

PGP - Pretty Good Privacy [Why, What and How]

In this blog, I will be discussing about a common technique used for encryption and decryption.

First of all, we will discuss on the importance of encryption and decryption. Encryption is the method of disguising plain text in such a way as to hide its substance from everyone and just provide the key/code/algorithm for people who need the access to the content. Decryption is the opposite of Encryption. The process of reverting the encrypted cypher text to read the original contents is known as Decryption.

There are many different ways of encrypting/decrypting content. Some of them are given below.
  1. Using different cryptographic algorithms to encrypt the content and then decrypt the content using the reverse algorithm. For example, RSA is one of the most commonly used algorithm.
  2. Using secret-key or symmetric key algorithm for encrypting/decrypting the content. Here in this case, we use the same key for both encryption and decryption. For example, DES is one of the most commonly used symmetric key algorithm.
  3. Using secure hash algorithms to hash an arbitrary length bytestring in to a 128 bit value. For example, MD5 is an example of one such algorithm.
PGP [Pretty Good Privacy] is an example of a public key encryption technique. This was written by Phil Zimmermann in 1991. Over the past few years, PGP has got thousands of adherent supporters all over the globe and has become a de-facto standard for encryption of email on the Internet. Also the PGP corporation is now acquired by Symantec and now the software is distributed under the PGP Software License Agreement.

For our demonstration, I will be downloading the version [PGP v6.5.8] which is part of the PGPi project. The PGPi project is a non-profit initiative, whose purpose is to make PGP freely and legally available worldwide. The project is largely based on unpaid, voluntary effort by security and privacy minded individuals.

To install the PGP, we have to first unzip the downloaded distribution into a directory. The next step is to run the setup.exe under the distribution <pgp_directory>. This will install PGP. To check if it got installed correctly, just type in the following command in the command line as shown below.


There are 3 major commands line arguments for PGP.
  • pgp -h: This is used for getting the usage summary and help on how to use the commands for getting the right results. If you type in this command in the command prompt, you will see as shown below.
  • pgp -k: This is used for getting the key management functions. This can be used to create/generate our own public/private key pair, or to extract a copy from the public or secret key pair, or to sign someone else's public key on our public key ring. If you type in this command in the command prompt, you will see as shown below.
  • pgp -g: This is used for using the group management functions. This command can be used for adding keys to a group, view the contents of a group. If you type in this command in the command prompt, you will see as shown below.

As a next step, we will see on how to generate a private/public key pair and then use that for encrypting a file and later decrypt it to see if it is actually working. Also we will see how to extract the public key from the key ring for distribution to outside vendors so that they can use it for encrypting the file and send it to us for decrypting it using our private key.

Type the following command in the command for starting the process to generate a public/private key pair.

cmd> pgp -kg

The next step is to select one of the public key algorithms. Here we have the following options:

1) DSS/DH (a.k.a. DSA/ElGamal) (default)
2) RSA
Choose 1 or 2
:
I will be selecting option 2 to select the RSA public key algorithm.

The next step required to pick the RSA key size. Here we have the following options:

1)  1024 bits- High commercial grade, secure for many years
2)  2048 bits- "Military" grade, secure for forseeable future
Choose 1, 2, or enter desired number of bits:
I will be selecting option 1 to select 1024 bits.

The next step is to provide a user id for our public key. This key is important because this key is what we use for encryption and also to extract the public key for distribution.

You need a user ID for your public key.  The desired form for this user ID is your name, followed by your E-mail address enclosed in <angle brackets>, if you have an E-mail address.
For example:  John Q. Smith <
jqsmith@nai.com>
Enter a user ID for your public key:
I will be providing a user id as 'javaclickonline.blogspot.com'.

The next step is to enter the validity period of your signing key.

Enter the validity period of your signing key in days from 0 - 10950
0 is forever (the default is 0):
0

The next step is add a pass phrase to protect our RSA secret key. A passphrase is a longer version of a password, and in theory, a more secure one. Typically composed of multiple words, a passphrase is more secure against standard dictionary attacks, wherein the attacker tries all the words in the dictionary in an attempt to determine your password. The best passphrases are relatively long and complex and contain a combination of upper and lowercase letters, numeric and punctuation characters.

You need a pass phrase to protect your RSA secret key.
Your pass phrase can be any sentence or phrase and may have many words, spaces, punctuation, or any other printable characters.
Enter pass phrase: I will be providing a pass phrase as 'pgp-javaclickonline secret key'.
Enter same pass phrase: Re-enter the same pass phrase entered above.

The next step is make this key the default signing key or not. Here in our scenario, I am selecting 'Y' to make it the default signing key.

With this the key generation is completed. See the below screenshot to demonstrate all the steps dicussed above for generating the public/private key pair.


The next step is to extract the public key from the key ring and then send it to any outside public. This key can be used for encrypting a file. For extracting the public key, we need to type the following command.

cmd>pgp -kx <user id>

We have to type the same user id we used while generating the key pair. If it finds any key in the key ring for the specified user id, we have to provide a file path for exporting the key. Here in our case, I have given the file path as 'C:\pgp\pgpjavaclickonline'.

See below screenshot for the above mentioned steps.


The next step is to encrypt a file from one machine [to show that it is a different vendor] using the public key and then decrypt the file from another machine using our private key.

To encrypt the file, we need to import the public key file [pgpjavaclickonline.pgp] on the vendor machine.

For importing the public key, type the following command in the command prompt and select 'Y' to add the key to the key ring.

cmd>pgp +force -ka <path to exported public key>

See below for the screenshot showing how to import the public key. The user id for the public key will be displayed as an output. This user id is required while performing encryption.

PS: See the ipconfig I have included on the top of the picture. This was done to show that it is running in a different machine.

The next step is to encrypt the file. For encrypting a file we need to create a simple plain text file as shown below.


Now in order to encrypt the file, type the following command onto the command prompt.

cmd>pgp +force -ea <file to encrypt> <user id> -o <file path to encrypted output file>


The contents of the encrypted file is a cypher text and is gibberish. It looks as shown below.


Now that we have encrypted the file. We can go to the other machine and see if we can decrypt the file.

For decrypting the file, we need to type the following command on to the command prompt.

cmd>pgp +force <pgp encrypted file> -z <user id> -o <file path to decrypted output file>

PS: See the ipconfig I have included on the top of the picture. This was done to show that it is running in a different machine.

The contents of the decrypted file is a plain text as shown below.


To summarize, we learned how to generate a public/private key pair. We also learned on how to extract the public key and then import it on a different machine. And finally we learned how to encrypt and decrypt a file using PGP.

If you want to read more on PGP, you can go to the following web site. This is the International PGP Home page - http://www.pgpi.org/doc

Apache Geronimo - Java EE 5 Application Server [Administrative Console functionalities - Setting up datasource]

In the previous blog [Apache Geronimo - Java EE 5 Application Server [Installing, Running and Deploying Application]], I have explained on how to install, run and deploy applications to Apache Geronimo server. In this blog, I will be detailing the steps required for setting up a datasource. In this example, we will be creating a mysql datasource. 

The following are the pre-requisites for this tutorial -
To create a mysql datasource, we need to have the mysql connector jar in the Geronimo repository. To add a jar to the Geronimo repository, we have to navigate to the Geronimo repository view by selecting Server > Repository on the console navigation menu. See screenshot below for the Geronimo Repository viewer.

The following are the mandatory fields that need to be entered.
  • File: Actual location of the archive
  • Group: Group identifier which is the name of the open source project, or directory tree matching the Java package prefix of the organization that supplies the library.
  • Artifact: File name prefix of the library.
  • Version: Version identifier of the library in the file.
  • Type: Type is the type of the file. eg: jar

If the mysql connector jar is added successfully, you can find the jar in the repository viewer as shown below.


Now in order to create a mysql datasource, click on the Services > Database Pools and then click on the link 'Using the Geronimo database pool wizard'. Select the name of database pool and database type and click 'Next' as displayed in screenshot below.


Next step is create and deploy the datasource. The Basic Connection Properties need to be configured for setting up the datasource.
  • Database Name: The name of the database
  • User Name: The user credential for the db
  • Password: The password credential for the db
  • Confirm Password: Re-enter the password
  • Server Name: The server on which the db is installed. In our case, mysql server is running in my local and hence 127.0.0.1 or localhost
  • Port Number: The database port number

After entering the basic connection properties and then click the 'Deploy' button. See in the below screenshot the datasource has been created successfully.


Now in order to check if the datasource was created successfully, we can select the newly created datasource and write a sql in the Run SQL section and click 'Run SQL' button. This should be done as given below.


Now as a next step we will create an application that uses this newly added datasource. For this, we will follow the same steps we followed for creating a simple web application in my previous blog [Apache Geronimo - Java EE 5 Application Server [Installing, Running and Deploying Application]]. In our application, I will only be concentrating on how to use the datasource in our application instead of focussing on the best practices or frameworks on using datasources.

As the first step, I will create a table and insert some rows into the table as shown below.


The next step is to create a servlet and add a resource reference to the datasource in the web.xml as shown below.


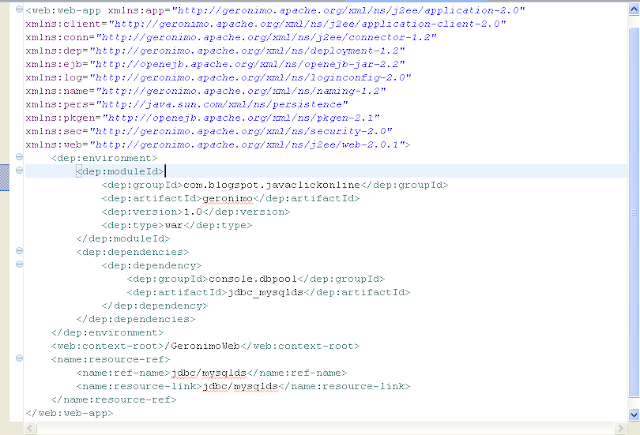
Also we need to add a resource reference in the geronimo's specific web.xml [geronimo-web.xml]. It should be displayed as shown below.


The point to be noted is that the <res-ref-name> in the web.xml should match to <name:ref-name> in geronimo-web.xml.

Next step is to initialize the servlet by overriding the init method. In this method, we will set the datasource by looking up the datasource.


Once the datasource is set, the next step is to override the doPost method as given below.


ProductDTO in the above method is a simple pojo with the following fields and its corresponding getters and setters.


Finally create a page [results.jsp] as given below.


PS: I added the jstl-1.2.jar under the WEB-INF/lib folder. You can find the jar in the geronimo distribution directory [<geronimo>/repository\javax\servlet\jstl\1.2].

Create the war file and deploy it as described in the previous blog. Once deployed you can access the application using the following URL - http://localhost:8080/GeronimoWeb/GeronimoAppServlet


To summarize, we have looked at how to create a datasource in the server and also how to use it in our application. In the next blog, I will be coming up with another interesting topic.

Tuesday, January 25, 2011


Apache Geronimo - Java EE 5 Application Server [Installing, Running and Deploying Application]

In the previous blog Apache Geronimo - Java EE 5 Application Server [General Overview], I just gave a general overview of the Application server, its integrated components and its advantages. In this blog, I will show how we can get started with working with Apache Geronimo. In this, I will be detailing about the installation, running and also about the admin console functionalities.

The following are the pre-requisites for this tutorial -
To install Apache Geronimo, download and unzip the Geronimo distribution [C:\Installed-Softwares\geronimo-tomcat6-javaee5-2.2.1].

To start Apache Geronimo, just type the following command on to the command line. [Note: On Windows, type 'cmd' in Start > Run to open up the command line]

Then navigate to the unzipped bin directory under the <geronimo_home/bin> [C:\Installed-Softwares\geronimo-tomcat6-javaee5-2.2.1\bin] and type the following command.

<geronimo_home/bin> geronimo start

See the screenshot below -


If the server started successfully, it will display as screenshot below


Once started, you can access the admin console using the link - http://localhost:8080/console.


Login to the admin console with the following credentials to access the administrative functionalities.

User Name: system
Password: manager


Next step is to create a simple web application and try deploying it to the Apache Geronimo application server. For this, we will be creating a simple web project. I will be concentrating on the specific files that need to be created for this example and not focus on each and every step of creating a dynamic web project.

A simple jsp - index.jsp is as given below. This file needs to be copied into <app_home> directory.


The following screenshot shows a common web.xml. This needs to be copied into the <app_home>/WEB-INF directory.


Next we need a geronimo specific file - geronimo-web.xml. This file needs to be copied under <app_home>/WEB-INF.


Once these steps are done, create a war file using the following command.

<app_home> java -jar <app_name>.war

The next step is to deploy the application into Apache Geronimo server. For this, select Applications > Deployer under the console navigation menu. Select the war file and click Install.
If you select the checkbox 'Start application after installation', then once the application is deployed and the application will be started.


To see the status of the deployed application, go to the Applications > Web App WARs under the left console navigation menu. This will display all the applications that are currently deployed to the server. If the application is deployed correctly, you can see the app as shown below.


There is also provision to stop, restart or uninstall the application from the above mentioned page.

To access the application, type in the following URL -


To stop the server, type the following command.

<geronimo_home/bin> geronimo stop

To summarize, we have learned how to install the Application server, start and stop the server and also deploy applications on the server using the administrative console. In the next blog post, I will be concentrating on the different Admin Console functionalities.

Sunday, January 23, 2011


Apache Geronimo - Java EE 5 Application Server [General Overview]
Apache Geronimo is a Java-certified, production-grade platform designed to allow developers to rapidly deploy and manage their applications. It is an integrated and highly functional application platform with all the functions of a JEE application server and also has various ways to identify/monitor the applications deployed on the server.

Apache Geronimo has integrated the following components:
  • Application Server (Application Geronimo)
  • Web server and servlet engine (Tomcat/Jetty)
  • JSP Compiler (Jasper)
  • JAX-RPC Web Services engine (Apache Axis)
  • JAX-WS Web Services engine (Axis2/CXF)
  • Relational database (Apache Derby)
  • Messaging (ActiveMQ)
  • User management services
  • Centralized administration console 
The advantages of Apache Geronimo are:
  1. Easy to use
    • The application server is very easy to use. It has a very good administrative console which helps in setting up the resources (JDBC/MQ/CMS).
    • Very easy to deploy applications using the well designed Admin console.
  2. Integrated development environment plug-in
    • Plug-ins available for Eclipse IDE. This helps in starting/stopping the server and also to publish applications to the server. It also has the capability to start the server in the debug mode for debugging.
  3. Easy development/deployment of Server components
    • Easy to develop and deploy the GBeans. GBeans are atomic units of the Geronimo framework. Almost everything in Geronimo is a GBean. For example - containers, connectors, adaptors, applications etc.
  4. Fully certified Java EE 5 Application server runtime
  5. Easy to learn
    • Apache Geronimo is designed to be very simple and easy to get started on the first day itself [provided the user has the basic knowledge of how to use application servers]. 
    • It has a very good tutorial on the web [Apache Geronimo Documentation].  
    • A good book to read [Pro Apache Geronimo - Kishore Kumar]
In the next post, I will be detailing more about the usage of the Apache Geronimo application server.

Tuesday, January 18, 2011


Apache Click in a Click - Part 4 [A Simple Example]

This part of the blog will be concentrating on demonstrating the steps to create a simple application using the apache click framework. If you happen to land on this page and if you are interested to learn more on the life cycle of Apache click, you can visit the Part 2 [Apache Click in a Click - Part 2 [Servlet Loading Life cycle]] and Part 3 [Apache Click in a Click - Part 3 [Servlet Request life cycle]] of the blog.

The following are the pre-requisites for this demo -
The first step is to create a new dynamic web project. See below screenshot for details.

The next step is to provide a name for the project. For our example, I am giving the name as ApacheClickv2.2.0.
Click on New Runtime and add the 'Apache Tomcat v7.0' runtime and click 'Next'.
 Browse to the Tomcat's installation directory and also select the JDK as shown below and Click 'Finish'.
Click 'Next' and set the 'Default output folder' as the 'WebContent/WEB-INF/classes' and click 'Next'.
Select the 'Generate the web.xml deployment descriptor' option and click 'Finish'. In the below screenshot, we can see the project is created with its required artifacts. 
Here I will be explaining how to implement a simple application. The application will have the following features [The application is simplified for the sake of the demo and we can extend on top of it at any level you desire].
  • Update User Profile
  • Display User Profile 
From the click's downloaded distribution, copy the following 2 jars under the folder [ApacheClickv2.2.0\WebContent/WEB-INF/lib]:
  • click-2.2.0.jar
  • click-extras-2.2.0.jar

For this first we need to add the ClickServlet configuration and also add a page in the welcome file list [web.xml] as shown below:

<?xml version="1.0" encoding="UTF-8"?>
<web-app>
<display-name>ApacheClickv2.2.0</display-name>
  <servlet>
    <servlet-name>ClickServlet</servlet-name>
    <servlet-class>org.apache.click.ClickServlet</servlet-class>
    <load-on-startup>0</load-on-startup>
  </servlet>
  <servlet-mapping>
    <servlet-name>ClickServlet</servlet-name>
    <url-pattern>*.htm</url-pattern>
  </servlet-mapping>  
  <welcome-file-list>
    <welcome-file>index.html</welcome-file>
  </welcome-file-list>
</web-app>


Next we need to create a file - index.html under the ApacheClickv2.2.0/WebContent directory as shown below.

<html>
   <head><meta http-equiv="Refresh" content="0;URL=userProfileLogin.htm"></head>
</html>

As explained in my previous posts, pages are the heart of the click framework. In our case, we need to create a Page class [UserProfilePage.java] that extends the org.apache.click.Page. The contents of the page should be as given below.

package com.blogspot.javaclickonline.app.pages;
import org.apache.click.Page;
import org.apache.click.control.FieldSet;
import org.apache.click.control.Form;
import org.apache.click.control.Submit;
import org.apache.click.control.TextField;
import org.apache.click.extras.control.DateField;
import org.apache.click.extras.control.EmailField;
import org.apache.click.util.Bindable;
import com.blogspot.javaclickonline.app.dto.UserDTO;
public class UserProfilePage extends Page {
 /**
  * 
  */
 private static final long serialVersionUID = -7563023865079430085L;
 private UserDTO userDTO = new UserDTO();
 
 @Bindable protected Form userProfileForm = new Form("userProfileForm");
 
 public UserProfilePage() {
  
  FieldSet fieldSet = new FieldSet("User");
  userProfileForm.add(fieldSet);
  
  TextField firstNameField = new TextField("firstName", "First Name", 20, true);
  firstNameField.setMaxLength(20);
  firstNameField.setFocus(true);
  fieldSet.add(firstNameField);
  
  TextField lastNameField = new TextField("lastName", "Last Name", 20, true);  
  lastNameField.setMaxLength(20);
  fieldSet.add(lastNameField);
  
  DateField dateOfBirthField = new DateField("dateOfBirth", "Date of Birth", 10, true);
  dateOfBirthField.setFormatPattern("MM/dd/yyyy");
  fieldSet.add(dateOfBirthField);
  
  EmailField emailField = new EmailField("email", "Email", 40, true);
  emailField.setMaxLength(40);
  fieldSet.add(emailField);
  
  userProfileForm.add(new Submit("Submit", this, "doSubmit"));
  userProfileForm.add(new Submit("Clear", this, "reset"));
 }
 
 public boolean doSubmit() {
  if(userProfileForm.isValid()) {
   
   userProfileForm.copyTo(userDTO);
   getContext().setRequestAttribute("userDTO", userDTO);
   setForward("displayUserProfile.htm");
   return true;
  }
  return false;
 }
 
 public boolean reset() {
  
  userProfileForm.clearValues();
  return true;
 }
}

In the above mentioned Page class, I have created a FieldSet. A field set is like a container which contains one or more controls. In this field set, I have added 2 Text fields, a Date field and an Email field. Once this is created, the field set is then added to the form. Also to the form, there are 2 submit buttons added - one is for validating and posting the result to the display page and the other button is for clearing the entered values.

The next step is to create a new page userProfile.htm under the ApacheClickv2.2.0/WebContent directory as shown below.
<html>
 <head>
  <title>Apache Click v2.2.0 Demo</title>
  $headElements
  $jsElements
 </head>
 <body>
  $userProfileForm
 </body>
</html>

The next step is to create a new Page class [DisplayUserProfilePage.java] which again extends org.apache.click.page.Page class.


package com.blogspot.javaclickonline.app.pages;
import org.apache.click.Page;
import org.apache.click.control.ActionLink;
import org.apache.click.util.Bindable;
import com.blogspot.javaclickonline.app.dto.UserDTO;
public class DisplayUserProfilePage extends Page {
 /**
  * 
  */
 private static final long serialVersionUID = 7097251195783330196L;
 
 @Bindable protected ActionLink back = new ActionLink("back", this, "backToUserProfilePage");
 private UserDTO userDTO = null;
 
 public void setUserDTO(UserDTO userDTO) {
  this.userDTO = userDTO;
 }
 
 public UserDTO getUserDTO() {
  return userDTO;
 }
 
 public boolean backToUserProfilePage() {
  setForward("userProfile.htm");
  return false;
 }
 
 @Override
 public void onRender() {
  super.onRender();
  userDTO = (UserDTO) getContext().getRequestAttribute("userDTO");
  addModel("userDTO", userDTO);
 }
}

The next step is to create a new page displayUserProfile.htm under the ApacheClickv2.2.0/WebContent directory as shown below.


<html>
 <head>
  <title>Apache Click v2.2.0 Demo</title>
 </head>
 <body>
  <table width="50%" cellpadding="0" border="1" cellspacing="0">
   <tr>
    <td>First Name</td>
    <td>:</td>
    <td>$userDTO.firstName</td>
   </tr> 
   <tr>
    <td>Last Name</td>
    <td>:</td>
    <td>$userDTO.lastName</td>
   </tr> 
   <tr>
    <td>Date of Birth</td>
    <td>:</td>
    <td>$userDTO.dateOfBirth</td>
   </tr> 
   <tr>
    <td>Email</td>
    <td>:</td>
    <td>$userDTO.email</td>
   </tr>             
  </table>
  <br/>
  $back
 </body>
</html>

Finally we need to modify the click.xml as given below.

 
<?xml version="1.0" encoding="UTF-8"?>
<click-app> 
  <pages package="com.blogspot.javaclickonline.app.pages"/>
  <mode value="trace"/>
  <headers>
    <header name="Pragma" value="no-cache"/>
    <header name="Cache-Control"
       value="no-store, no-cache, must-revalidate, post-check=0, pre-check=0"/>
    <header name="Expires" value="1" type="Date"/>
  </headers> 
</click-app>  

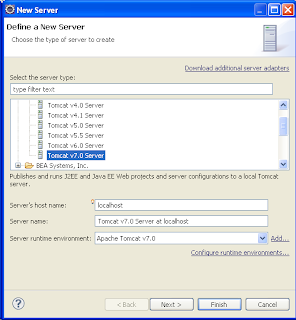
Create a new Server configuration for deploying the application. Right click in the server view and select New --> Server. The New Server dialog opens as shown below.

Select Tomcat v7.0 Server configuration and click Next.
Select the project - ApacheClickv2.2.0 and click Add and click Finish. Launch the server. If the application is deployed correctly, you can access it using the following url - 

http://localhost:8080/ApacheClickv2.2.0


Enter the fields and click on Submit. The user will be diverted to the display user profile page.


With this we have completed all the 4 part - Apache Click v2.2.0 Tutorial. 

In the next blog/post, we will dig deep into a different Java framework/feature.