 | Apache Geronimo - Java EE 5 Application Server [Administrative Console functionalities - Setting up datasource] |
In the previous blog [Apache Geronimo - Java EE 5 Application Server [Installing, Running and Deploying Application]], I have explained on how to install, run and deploy applications to Apache Geronimo server. In this blog, I will be detailing the steps required for setting up a datasource. In this example, we will be creating a mysql datasource.
The following are the pre-requisites for this tutorial -
To create a mysql datasource, we need to have the mysql connector jar in the Geronimo repository. To add a jar to the Geronimo repository, we have to navigate to the Geronimo repository view by selecting Server > Repository on the console navigation menu. See screenshot below for the Geronimo Repository viewer.
The following are the mandatory fields that need to be entered.
- File: Actual location of the archive
- Group: Group identifier which is the name of the open source project, or directory tree matching the Java package prefix of the organization that supplies the library.
- Artifact: File name prefix of the library.
- Version: Version identifier of the library in the file.
- Type: Type is the type of the file. eg: jar
If the mysql connector jar is added successfully, you can find the jar in the repository viewer as shown below.
Now in order to create a mysql datasource, click on the Services > Database Pools and then click on the link 'Using the Geronimo database pool wizard'. Select the name of database pool and database type and click 'Next' as displayed in screenshot below.
Next step is create and deploy the datasource. The Basic Connection Properties need to be configured for setting up the datasource.
- Database Name: The name of the database
- User Name: The user credential for the db
- Password: The password credential for the db
- Confirm Password: Re-enter the password
- Server Name: The server on which the db is installed. In our case, mysql server is running in my local and hence 127.0.0.1 or localhost
- Port Number: The database port number
After entering the basic connection properties and then click the 'Deploy' button. See in the below screenshot the datasource has been created successfully.
Now in order to check if the datasource was created successfully, we can select the newly created datasource and write a sql in the Run SQL section and click 'Run SQL' button. This should be done as given below.
Now as a next step we will create an application that uses this newly added datasource. For this, we will follow the same steps we followed for creating a simple web application in my previous blog [Apache Geronimo - Java EE 5 Application Server [Installing, Running and Deploying Application]]. In our application, I will only be concentrating on how to use the datasource in our application instead of focussing on the best practices or frameworks on using datasources.
As the first step, I will create a table and insert some rows into the table as shown below.
The next step is to create a servlet and add a resource reference to the datasource in the web.xml as shown below.
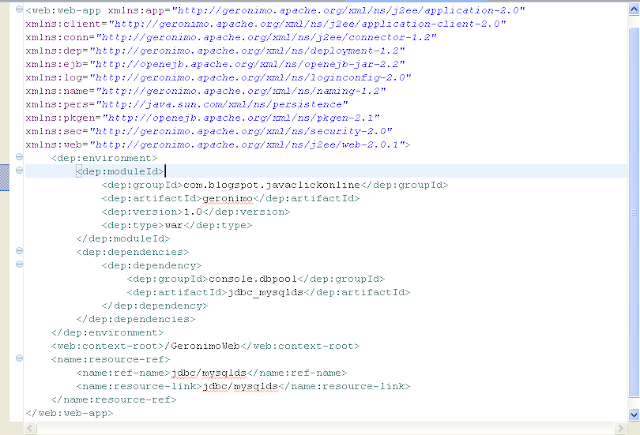
Also we need to add a resource reference in the geronimo's specific web.xml [geronimo-web.xml]. It should be displayed as shown below.
The point to be noted is that the <res-ref-name> in the web.xml should match to <name:ref-name> in geronimo-web.xml.
Next step is to initialize the servlet by overriding the init method. In this method, we will set the datasource by looking up the datasource.
Once the datasource is set, the next step is to override the doPost method as given below.
ProductDTO in the above method is a simple pojo with the following fields and its corresponding getters and setters.
Finally create a page [results.jsp] as given below.
PS: I added the jstl-1.2.jar under the WEB-INF/lib folder. You can find the jar in the geronimo distribution directory [<geronimo>/repository\javax\servlet\jstl\1.2].
Create the war file and deploy it as described in the previous blog. Once deployed you can access the application using the following URL - http://localhost:8080/GeronimoWeb/GeronimoAppServlet
To summarize, we have looked at how to create a datasource in the server and also how to use it in our application. In the next blog, I will be coming up with another interesting topic.


No comments:
Post a Comment